How to Hardwire a Dash Cam?
(A complete end to end guide for installing a dash cam with hardwire kit)

Hardwiring a dash cam to a car/fleet’s fuse box is the most effective installation method to power up your dash cam 24/7, even when your vehicle’s engine is turned off. It eliminates the need to have your dash cam plugged into the cigarette lighter socket of your car, providing a constant flow of electrical power. This hardwiring installation method requires a hardwire kit.
ROVE offers a ready-to-use 3-lead hardwire kit for you that includes a Mini-USB, 4 x 2 Piggy Back Fuse Taps/Cable, 4 x 2 Fuse Type, 30V Voltage Meter, Fuse Puller/Removal, 4x Wire Ties, Trim Tool & 4x Cable Clip, and a user Manual. The 3-lead hardwire kit has become widely popular among drivers for its capability of activating the 24 hours triggered parking mode feature in specific advanced dashboard cameras – that do have a parking mode feature.
‘Hardwiring’ is not ‘hard’ at all! Follow the simple and easy steps throughout this blog post to hardwire a dash cam using the ROVE Ultimate 3-lead hardwire kit.
1. Decide a perfect place to mount the dash cam
Finding a perfect spot for a dash cam installation is essential and requires many trials in different positions. By far, the windshield is the most popular place to install a dashboard camera. Most dash cams, including ROVE, use a suction cup or double adhesive mounting system to adhere to the windshield.
You need to be very careful about the mounting spot in the windshield. You don't want the dash cam to obstruct the front view sitting in the driver's seat. Moreover, many countries have specific restriction laws on dash cam mounting – to avoid those, check out your state’s traffic law guide.
We recommend mounting a dash cam in the middle of the windshield and right behind the rearview mirror. The mirror itself blocks this specific area in the windscreen. Hence, you don’t need to be concerned about obstructing your view further. It is always best to check live footage from your smartphone while installing the dash cam, ensuring the perfect camera angle. However, it is only possible with advanced dash cams like ROVE R3, R2-4K, or Stealth-4K with a WIFI feature or a smartphone application.

2. Locate the Vehicle's Fuse Box
A fuse box is the house and controller of the electrical current that flows through all electrical components of the car. It also safeguards the electricals from being short-circuited. Your dash cam is an electrical component. Therefore will be connected to the vehicle’s fuse box through the hardwire kit to get powered up.
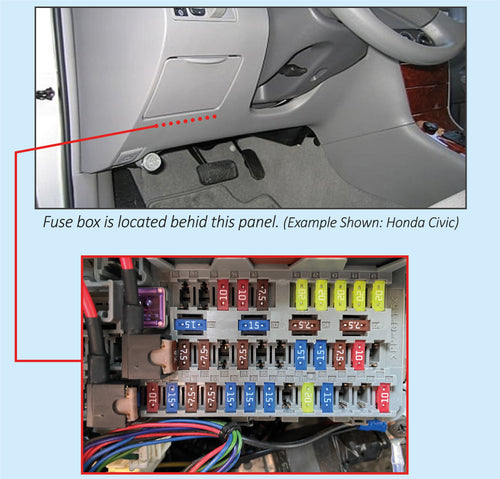
To proceed with the hardwire kit installation process, first, you need to locate the fuse box in your vehicle. The location of the fuse box varies depending on your vehicle’s model and year of manufacture. Getting access to the fuse box may require prying with a trim tool or simply pulling some panels – which is also dependent on your vehicle’s model.
Typically, most vehicles have a fuse box underneath the driver’s side glove compartment in the steering column. In this case, it is effortlessly accessible behind a removal panel. If this is not your condition, consult your vehicle’s owner's manual, or give a quick search on Google.
3. Determine the correct Fuse Slot for the Hardwire kit installation
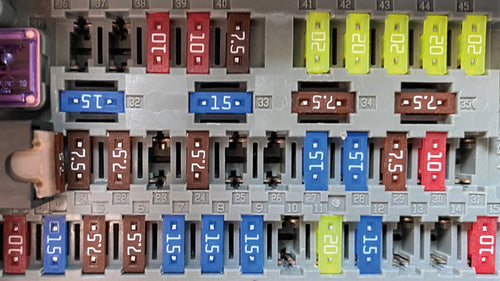
The vehicle’s fuse box comprises numerous fuse slots. Generally, few of them have power even when the engine is turned off, while other fuses only get powered when the vehicle starts to run. We recommend users to use fuse slots ratted between 10A-30A to have the dash cam get enough power supply for working. Always refer to the owner's manual to avoid fuse slots responsible for certain safety features within your vehicle. For example, prevent fuses in charge of airbags, stability control programs, horns, indicators. Fuses that deal with components like the AC, radio, sunroof, boot opener are generally safe to use.
Most hardwire kits, including ROVE’s, come with three wires that connect to the fuse box. The first wire (usually red) connects with a constant fuse, the second wire (typically yellow) goes into an ACC or ignition fuse, the last wire ( in the shape of a ring and black in color) fits into a metal ground bolt.
A constant fuse is a fuse that stays on all the time, supplying power even when the vehicle’s engine is turned off. And an ACC/ignition switch fuse depends on the vehicle’s ignition – this fuse slot only provides power when you turn your car’s key turn to ACC position. The ground metal bolt works to prevent electric shock.
TIP: Use the voltage meter ( included in our 3-lead hardwire kit) or equivalent to figure out the constant and ACC/ignition-switched fuses.
4. Install an Add-A-Fuse Tap
An Add-A-Fuse / Piggy-Back Fuse Taps make fuses safer and long-lasting. It has many variations, including Mini, ATO, Micro, and Micro2. Refer to your vehicle’s owner’s manual to determine the suitable Piggy-Back Fuse Tap for your car/fleet’s fuse box.
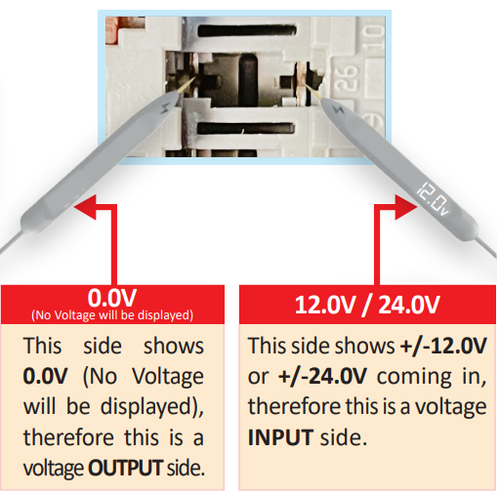
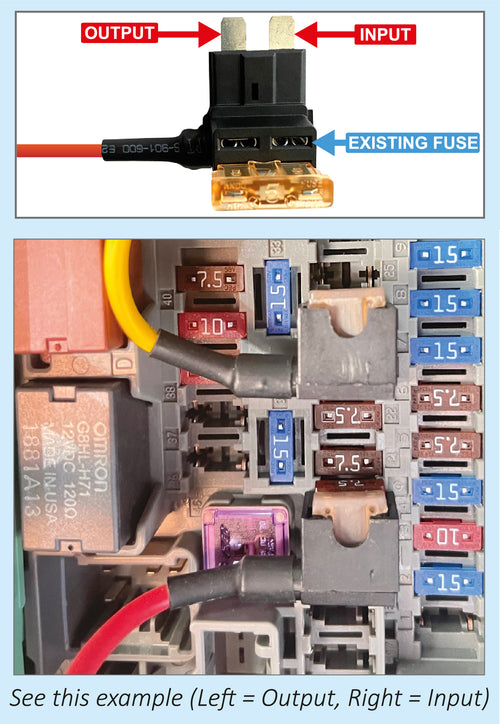
Before connecting the piggyback fuse-taps to the fuse slot, you must identify the slot's voltage INPUT and OUTPUT sides. It can be effortlessly determined using the included voltmeter in our hardwire kit.
Begin by testing each side of the fuse slot connector one at a time. If a reading of +/-12.0V / 24.0V or near appears on your voltmeter, mark it as voltage INPUT side. The voltage OUTPUT side will display 0.0V ( because no current passes).
NOTE: Ensure that your vehicle’s key is appropriately positioned to power up the fuse slot you are testing, giving a correct voltage reading. That means if you are testing the ACC fuse, confirm that the key is turned to ACC position before testing. And make sure the key is turned off and removed while testing the constant (Always HOT) fuse to identify the correct fuse slot.

5. Fit the RED & YELLOW Fuse Taps to the respective Slots.
Once you have figured out the INPUT and OUTPUT sides of the fuse slots, it's time to insert the RED Add-a-fuse cable to the constant (always HOT) fuse slot. And the YELLOW Add-a-fuse cable to the ACC fuse slot in the correct INPUT and OUTPUT orientation.
The Add-A-Fuse fuse taps have two fuse slots. The hardwire kit cables come pre-installed in the first slot. If you find the identified fuse slot with an existing fuse fitted in it, then slip it into the second slot of the piggyback fuse tap within the correct orientation.
Before finally crimping the Add-A-Fuse taps to the fuse slots, recheck the connection using the included voltmeter in the hardwire kit, ensuring a perfect installation.
Turn off the car key and pull it out before testing constant fuse installation. On touching the aluminum end of the RED Add-A-Fuse cable, the voltmeter should display a voltage reading of either +/- 12.0V or +/- 24.0V, supplying constant power to the dash cam. If this does not seem to be the case, recheck the connection and fix the errors.
On the other hand, the YELLOW piggyback cable should show the same voltage reading of either 12.0V or +/- 24.0V only on turning your vehicle’s key to the ACC position.
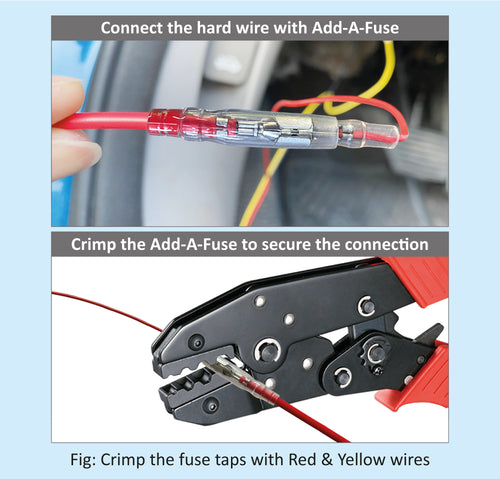
If you found all the voltage readings appropriate, ‘great job,’ you have successfully installed the Add-A-Fuse taps. Go ahead and crimp the installation.
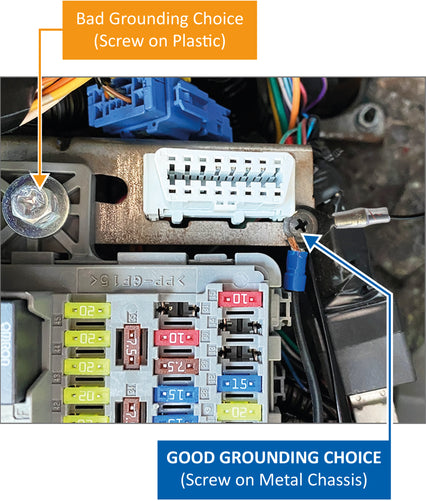
6. Locate a Ground Point and Connect the Add-A-Fuse taps to the Hardwire Kit.
Grounding the hardwire kit is crucial to avoid shocks from unexpected circuit failures in the fuse box. Once the hardwire kit is connected to the constant and ignition-switched fuse, you can slip the ground wire under any metal bolt or screw in your vehicle. The nut or bolt you choose to ground with requires a socket wrench set to get loosened. The most common sizes are 10mm and 12mm. However, specific german vehicle models need Torx bolts.
Loosen the nut or bolt enough to slip it in and tighten it back up afterward to attach the grounding terminal. The hardwire kit's poor or loose grounding can result in uneven current flow, causing dashcam power issues. Grounding is always best on an unpainted metal bolt. And if your vehicle has a factory ground, it is an ideal spot.
Now at this point, when you installed the piggyback taps and identified the grounding point, securely connect the RED and YELLOW fuse taps with the respective RED and YELLOW wires of the hardwire kit using a crimp tool or a pair of pliers.
7. Test the Dash Cam Installation
Once the hardwire kit is installed successfully to the fuse box, insert the key to your car’s ignition and give it a start. If everything works fine and the dash cam starts recording, zip the excess wires to avoid blocking the fuse box access. At this stage, you can reinstall all the interior panels that have been removed to ease the tucking of the power cable. Please be sure that all the wires are tightened and not blocking your access to the vehicle.
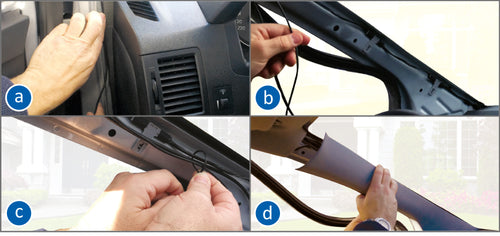
8. Start routing the power cable for professional installation.
Run the power cable tightly through the windshield's edges until the fuse box. Start by tucking the cable wire into the headliner. In most cases, simply plucking on the rubber trim along the A-pillar results in a gap where you can run the power cable from the headliner to the fuse box. In rare conditions, it might be necessary to uncover the A-pillar to gain access. Most A-pillars’ covers can be removed by simply popping them off. If you are not sure how to remove the interior panels, consult your vehicle’s technician manual or a professional.